Monday, October 11, 2010

Sunday Morning Bacon

As the orange light of autumn's sun casts ever lengthening shadows across the leaf-littered street, I find myself yearning for a familiar and comforting aroma to ease me into the day: bacon! There is little that can awaken my sleepy spirits as effectively as that salty smoke released by the hot sizzle of morning bacon and I most enjoy tasting it layered between fluffy herbed eggs, fresh garden tomatoes, and lightly dressed greens. Eric calls it a B.E.L.T, but I simply exclaim: Mmmmm!

Sunday Morning B.E.L.T:

Ingredients: (serves 2)
1 small fresh tomato, sliced
6 pieces of your favorite crispy bacon (for a less fatty version, turkey bacon can be used and is equally delish!)
2 1 inch thick slices of your favorite bread- we use rosemary salt
2 handfuls of your favorite greens, lightly dressed in a sherry vinaigrette
3 eggs seasoned with salt, pepper, and freshly chopped parsley, beaten
Extra Virgin Olive Oil to taste

Method:
1. Cook your bacon and remove it from the heat to drain on a paper bag or towel after it's crisp
2. Add your bread slices to fry in the bacon grease until golden brown
3. Prepare your eggs, by making a french-style omlette (see Julia Child's excellent demonstration here: http://www.youtube.com/watch?v=LWmvfUKwBrg) which yields the most light and fluffy eggs as well as the easiest to divide and layer onto your B.E.L.T.
4. Dress your greens by drizzling with extra virgin olive oil and a few drops of sherry vinaigre
5. Assemble your B.E.L.T. by layering your toasted bread, then egg, then bacon, then tomato, then dressed greens.

Happy eating!

Monday, October 4, 2010

The Most Delectable Block in Ballard!


It has been nearly 5 years since I began my first wanderings through Ballard, WA and it was only last week that I discovered for the very first time, the most delicious block in the area! At first glance, it seems almost unnoticeable and then a slight breeze dances past your nostrils and you realize, all of a sudden, that you are standing at the brink of brilliantly delectable discovery. Your feet instinctively follow the aromas wafting down the street and deposit you at a place to which you anticipate building a budding and long-term familiarity: Delancey (http://delanceyseattle.com/).

Once inside, the honey-colored glow of candlelight twinkles across the kitchen to meet with the oven’s fantastic flame that is transforming the limp, pale dough into a bruised and rough mass of melted cheese and crispy bread. The crunch of toasted dough is softened by the moist, supple interior; you are a puppet- pulled into a trance by the flavors and textures that dazzle your mouth. The pizza is followed by a sinful and silky desert of caramel nectarines reclining atop a satin pillow of whipped cream; and a cookie, simple and comforting in its rich luxuriousness.

Sunday, October 3, 2010

Family Dinner


All families have their quirks and it's sometimes difficult to understand how so many different kinds of people can possibly come from the same genes. But then, amidst the chaos and frustrations, there appears out of nowhere a glimmer of connection and all of a sudden, maybe even just for that moment, the crazy unit we know as our family makes sense and we feel like we belong together after all.

In honor of my big, zany, wonderful, lovable family, I made a simple prosciutto-wrapped salmon topped with a tomato and shallot relish and accompanied with wilted chard and roasted turnips. The outcome was a delightful evening spent with people who warmed our home and hearts with all of the little idiosyncrasies that make them our family.

Prosciutto-Wrapped Salmon with Wilted Chard and Roasted Turnips (serves 6)

Ingredients:
6 4oz salmon filets, center cut
8 thin slices of prosciutto
1 shallot
2 handfuls of cherry tomatoes, sliced lengthwise
2 bunches Swiss Chard, cut into 1 in. chiffonade
8 medium Turnips, sliced into rounds
Extra virgin olive oil to coat the skillet
1 Tbs butter
salt and pepper to taste

Method:
1. Trim the filets and wrap with a slice of prosciutto
2. Coat the Turnip rounds in olive oil and season with salt and pepper to taste; Put them into a 400 degree oven until they have browned
3. Heat a large skillet over medium-high, add olive oil and a butter to coat and then add the wrapped salmon to sear. Once the bottom is nicely browned, put the shallots and garlic into the skillet and put that into the oven for about 10 minutes, until the salmon is cooked.
4. Remove the salmon, keeping the shallots in the skillet, and let them rest on a plate
5. Place the skillet back on the medium burner and add the cherry tomatoes to the shallots, toss them until they are warmed through- about a minute- then pour it over the salmon
6. Using the same skillet, wilt the chard over medium heat, being sure to add some more olive oil and salt and pepper to taste.

So get some booz, call your closest relatives, and enjoy an evening dining together with the ones who made you who you are.

Happy Eating!
- Dre


Friday, September 24, 2010

Homeward Bound: Day 8

My long lost beloved friend, Jen, and I at the Sweet Auburn Curbside Market- A must visit in the ATL!

I sit on the porch with a cuddly pup at my feet and a warm breeze through my hair and wonder what comes next. Traveling, no matter what distance, is always accompanied by a journey; a story; a new familiarity. I sense a renewed excitement for the unknown road ahead and look forward to the everlasting journey that is turning out to be my life. So thank you Atlanta, for your charming grace and endless hospitality, for your grits and shrimp and pimento cheese, for your sweaty days and comforting warm nights, and most of all, thank you Atlanta for nurturing our family to help them blossom and laugh so they may welcome us home at our next return.


Wednesday, September 8, 2010

Atlanta Day 5: North Georgia


A view of the Appalachian foothills in North Georgia, some of the most beautiful country I have ever visited.

Talullah Falls at Talullah Gorge in North Georgia, the site of my very first boiled peanut tasting and suspended bridge crossing.

The 251 steps down to and back up from the suspended bridge.

The Bridge.

Crane Creek Vineyards in North Georgia. A lovely setting to rest on our adventure day before heading back to Atlanta.

My beloved family! Well... some of them.

Wednesday, September 1, 2010

Atlanta Day 4: Blooms


A favorite orchid from the Atlanta Botanical Gardens Orchid House*.


Lily pods in the pond outside of the Botanical Garden culinary gardens and demonstration kitchen.

Shrimp and Grits from Rosebud**, one of the most delicious meals I've ever tasted in Atlanta- or, anywhere, really.

Monday, August 30, 2010

Atlanta Day 3: The Chatahoochie and Her Forest

Wandering through the heavy serenity and inhaling fragrant breaths of moist air perfumed by oak, I am awed at the beauty of this place. We wind adjacent to the shore of the Chatahoochie River and listen for the squawks of geese bathing in its cool running waters. Eric and I marvel at our chance encounters with the many rock caves and plateaus that look like abandoned spaceships and imagine what it would be like to camp out in their cool, dark depths. It is such a treat to visit this National Park at Island Ford*, and fall back into a time when Georgia was hushed and uncluttered with people. To truly explore a place, is to know its calm as well as its commotion, and standing here sheltered by the mighty magnolias and oaks, I feel that we are one step closer to knowing Georgia.


* http://www.nps.gov/chat/

Monday, August 23, 2010

Atlanta Day 2: Family and Friends and Tapas, Oh My!

Roasted figs topped with bacon and herbed goat cheese and roasted spiced almonds

Today was a day of feasting. We awoke to the promise of a fulfilling southern breakfast at a jubilant little restaurant called The Flying Biscuit, a place not unknown to locals as evidenced by the 30 minute waiting list and hoards of satisfied people coming and going through the front door. Once our happy moment arrived, we slipped through the hungry crowds, weaved between brightly colored tables radiating cheerful chatter, and installed ourselves at a pleasant little table draped in a bright blue and pink floral oil cloth to the rear of the room. The menu was crammed with tempting treats and I went with the first to catch my eye: The Southern Scramble, which was a heavenly marriage of collard greens, caramelized onions, spicy eggs, and cheddar accompanied by a bowl of “creamy, dreamy grits” and a biscuit so tall and fluffy I almost thought that it would begin to fly! Naturally, I stuffed myself sick, but could find no morsel of remorse, for the food was so satisfying and delicious that to regret tasting even one bite would be unthinkable!

Cumin Chickpea Spread and Crostini with Tomato Jam


We returned to Chez Nightingale just in time to help my talented and beautiful sister-in-law, Lindsay, prepare her most exquisite menu for the tapas party later that evening. The Nightingale women bonded together in a cooking frenzy to braise, slice, dice, sauté, grill, taste, drink, and laugh over an infinite mess of splatters and spills that covered the kitchen from ceiling to floor. This scene is always the one I am most eager to meet during our visits to Atlanta- three determined and focused women learning about each other and becoming a closer family through cooking. Finally the dishes were topped with their final garnish and set on a most inviting table amidst sunflowers and candles and the invités swarmed around the feast like moths to a flame exhaling mmm’s and oooh’s between bites. They coddled their crostinis with cumin chickpea spread and tomato jam, Spanish meatballs in saffron sauce, rioja-braised chorizo, caramelized mushrooms, toasted spiced almonds, grilled summer vegetables, garlic prawns, and red or white sangria like precious treasures and nibbled them with such care and attention that we beamed with fulfillment at the compliment. By the end of the feast, all were drunk with joy (and sangria too!) and laughed together amidst the intoxicating aromas of sweet spices and food carefully prepared for the ones we love and make us whole.


Grilled Summer Vegetables and Spicey Garlic Prawns

Saturday, August 21, 2010

Atlanta: Day 1

A thick blanket of fragrant humidity envelops my body in a familiar and comforting grasp; I happily find myself in a paradise where night’s cloak reveals the melodious treasure of a forest orchestra serenading me through pianos and fortes of chirps and hisses. This place vibrates with music and color; the dazzlement of my senses is only dampened by the heavy moisture that lingers on the air, compressing my soul in on itself like a heavy brick, a sensation not altogether unwelcome, for it permits me to look inward, for a change. To say that I feel, “in my element” here might be a gross understatement. All life seems to thrive here and so why should I be any different? I long to go out into the night and dance through the heavy sky, if only just for a moment to feel the temperature collision that arises between my naked skin and the sweet warm air. I feel like a flower on the verge of bloom; excited and trembling at the curiosity of my unknown fate. This is it. I am grateful for it. The future awaits.

Monday, August 16, 2010

Roasting In the Heat

My adoring hubby has been so supportive of my recent obsession with discovering more traditional Italian recipes, that he recently contributed to my ever-growing food library with a most wonderful book: The Italian Farmer's Table by Matthew Scialabba and Melissa Pellegrino, in which I discovered this surprising recipe for roasted veggies. I think I may have stumbled upon a new way of making my beloved Ratatouille- the vinaigre lends an especially delightful tang that is mellowed by the sweetness of the carrots and peppers. Eric and I let the veggies cool to room temp and ate this as a topping to toasted day-old baguette… YUMM! What a way to eat your veggies and roast in the heat!


Tomato Roasted Veggies- Adapted by me from The Italian Farmer's Table:

1 small eggplant, julienned (matchstick cut)

1 bell pepper of your choice, julienned

1 sliced onion

2 cloves garlic, minced

3-5 Tomatoes, puréed

Extra Virgin Olive Oil to coat veggies (~1/4 cup)

2 Tbs red Wine Vinaigre

Salt and Pepper to taste

1 tsp red pepper flakes

1 cup chopped fresh basil

½ cup chopped parsley


1. Preheat the oven to 425 Fahrenheit

2. Toss the veggies with the olive oil, vinaigre, seasoning, and tomato purée and pour onto a sheet pan in an even level (for even cooking)

3. Roast until the liquid is all evaporated and the veggies are soft (40-75 minutes)

4. When done roasting, remove from the oven, and top with the chopped parsley, basil, additional seasoning (salt and pepper if needed), and drizzle of olive oil

5. Let cool to room temperature and serve over toasted bread, aside your morning omlet, or over pasta


Happy Eating!

Luv,

Andreya


Thursday, August 12, 2010

Thursday Taco Cravings

So it turns out that today, Thursday, is an amazing day for tacos. Eric and I have been suffering from taco cravings for at least the past three days, made several failed attempts to procure them, and finally decided to satiate our search today at not only one meal, but two! I got home from work to sadly discover that there were no tortillas to be found in the kitchen and rather than venture out into the noisy, overly-populated city, I decided to try my hand at hand-made corn tortillas, which turned out a little less than perfect, but when topped with smoked salmon and parsley were delicious nonetheless! I'm definitely determined to get those tortillas perfect... stay tuned for that! Yumm!!!


And then later, for dinner, we made the most delicious steak and corn salsa tacos that inspired every single taste bud in my tongue to tingle with delight and.. well.... the taco cravings are now gone!


Craving-Satiating Steak Tacos:

1 lb steak of your choice
Pinch of Cinnamon, Pimentòn, Cumin, Salt, and Pepper
Extra Virgin Olive Oil
2 cloves garlic, crushed
1/2 red onion, diced
1 stalk corn, steamed in it's stalk and the corn cut off
2 scallions, chopped
1 tomato, diced
1/4 fresh lime juice
1 Tbs cilantro
6 corn tortillas

1. Marinate the steak in the spices, garlic, and 1/4 cup of the onion (let it sit for at least 1 hour)
2. Make the salsa by combining the corn, 1/4 cup red onion, scallion, tomato,cilantro, and lime juice
3. Sear the steak and cook about 4-6 minutes on each side. Remove from heat when it's just under the desired done-ness and let rest for a few minutes
4. De-glaze the pan with water and add the marinating ingredients to the liquid while it reduces
5. Slice the steak and add back to the reduced sauce just to glaze
6. Cook the tortillas and add meat and salsa


Happy Eating!!!
Luv,
Andreya


Wednesday, August 11, 2010


Not that long ago, Eric and I found ourselves finished with the day's work and discovered a magnanimous void in the pit of our stomaches... What was that? we wondered. Could it be hunger? Yes, indeed! A mighty hunger so great that minstrels from near and far would sing of it's endless greed. There was but one solution, and being that it was so near the end of a very long day, we scrounged through the fridge and pantry to find, much to our joy, a zucchini, onion, tomato, parsley, fresh mozzarella, and same day-old baguette. Without much ado, we hastily sliced and diced our treasured objects, gingerly caramelized the onions, quickly sautéed the zucchini, and neatly dressed the tomato in balsamic vinaigrette. After the baguette came out of the oven all oozing and goozing with melted and browned mozzarella, we adorned its scrumptiousness with a crown of lovingly prepared veggies and feasted a meal so full of delicate and powerful flavor, that the mighty hinger void was satisfied and forever silenced... well... at least until the following morning.


Stomach-Void-Satisfying-Bruschetta:
Serves 2-4

1 day-old or toasted baguette cut in half lengthwise
1-2 balls fresh mozzarella, sliced
2-4 fresh tomatoes, diced
1 onion, sliced and caramelized
2 zucchini, diced and sautéed in extra virgin olive oil until just softened (1-2 minutes)
Freshly chopped Parsley to taste
Salt and Pepper to taste
2-3 Tbs Extra virgin olive oil for drizzling and the vinaigrette
1-2 tsp Balsalmic Vinaigre

1. Preheat oven to 400 degrees and then add the baguette topped with the mozzarella. Toast until the cheese is nicely browned
2. Put the cut tomatoes into a large bowl and coat with the vinaigrette (1:3 ratio Balsalmic to Olive oil)
3. Add the zucchini and caramelized onions and right before the bread comes out of the oven, toss together being sure to taste for seasoning
4. Once bread is removed from the oven , immediately add the chopped parsley and drizzle with olive oil. Cut into desired-sized pieces, and top with the veggie mix (be sure to use a slotted spoon for the veggies so that you don't end-up with a soupy mess).
5. Eat already!


Hope you enjoy!

Luv,
Dre


Monday, August 9, 2010

First Official Cooking Class: Bread and Tomatoes


Alison and I reviewing the menu and recipes for class

Last Friday, I hosted my very first official cooking class to my very first official student, Alison, and all I can say is that it was bliss! The menu was a bit over-ambitious, but Alison toughed it out like a champion and made some the most beautiful and tasty food I have ever experienced! The pièce de résistance was a completely made-from-scratch pizza topped with a sweet and spicy tomato sauce, Crimini mushrooms caramelized in Port, caramelized red onion, fresh mozzarella, and freshly-chopped Basil and Parsley all accompanied by a red and green leaf salad dressed in walnut-sherry vinaigrette (all crafted by my star pupil!). The lesson lasted nearly 4 hours, but by the end of the evening, we feasted like two queens and a king (Eric) and I can honestly say that I've never tasted food that touched my heart the way Alison's did. Thanks Alison, for letting me be a part of your journey through the kitchen and, hopefully, to a newly-found enjoyment in cooking.


Alison and her masterpiece!

Sweet & Spicy Tomato Sauce:

1 28oz can Fire Roasted Tomatoes, puree
1 red onion, minced
2-3 cloves of garlic, minced
2-3 pinched red pepper flakes
Pinch of cinnamon, freshly-grated nutmeg, cloves, and pimentòn
Salt and Pepper to taste
Extra Virgin olive Oil
2-3 Bay leaves
Fresh basil and parsley

1. Heat a large sauce pan, add olive oil to coat the bottom, then add the onion, pinch of salt, pepper, cinnamon, nutmeg, clove, and red pepper flakes then mix together
2. Add garlic and another pinch of salt
3. Mix again and then let the onions sit for a few seconds until a brown syrupy-type liquid begins to form on the bottom of the pan
4. De-glaze with the puréed tomatoes, being sure to scrape up any brown bits from the bottom of the pan
5. Add the bay leaves and a few stalks of the basil and parsley, cover, and let simmer for at minimum 1 hour, but the longer the better.
6. When done (should be a thick consistency), taste for seasoning and adjust (add more salt and pepper if needed) and add freshly-chopped basil and parsley to your liking.

Serve over pasta or as a pizza sauce.


Happy Learning, Cooking, and Eating!!!
Luv,
Andreya


Saturday, August 7, 2010

Simply Green Dinner


Despite the rampant love affair with cooking and baking that consumes my nearly every thought, I sometimes just don't feel like getting out the pans and knives and tonight is one such night... the ideal night, in fact, for a simply green dinner! Perhaps not as greenly locavore as some might want, but an unmistakable green all the same. Behold What's-In-My-Fridge-Guacamole, Not-Yet-Stale Tortilla Chips, and yesterday's bottle of Kiona 2006 Lemburger- Yumm! Tired simplicity at it's tastiest!

Ingredients:
1 Ripe avocado, diced
1 small shallot, minced
1/2 freshly-squeezed lime juice
1 green onion, chopped
1 Tsp fresh cilantro, chopped
Salt and Pepper to taste

Preparation:
Throw it all into a bowl and crush with a fork to the desired consistency


Happy Eating you lazy slobs!
Luv,
Dre


Thursday, June 3, 2010

A Stray in Loyalty...

Ravioli crafted by Pasteria Lucchese- my gracious and talented teachers!

A recent abundance of happy chance and patient teaching has lead me to the sacred world of Italian pasta-making. My teachers are a beautiful couple who can turn an ugly lump of flour and water into the finest silk that sinfully melts upon the tongue and I am slowly finding my heart swoon in a new direction... could it be that I am seriously contemplating a small stray in my loyal relationship with cooking to follow a newly-kindled passion for baking?

Moistly dry dough is coaxed into form; stuffed, shaped, and cut into supple sturdy packages of ravioli, plin, and cappellacci. Aromas of meaty unctuousness waft to the very core of my marrow, sending my skeleton to dance in the delights that are inspired by such simple... such basic... such essentially ancient flavors. It's as if my soul was born to shred and chew the delicate pillows, allow their contents to gently slide down the back of my throat, and humbly sustain my life for one day more.

I am in love. From slumber's first end, my hands yearn to press and turn that lumpy mass; to pour my heart's gladness and sorrows into its rough, round folds; to nurture it and mold it and listen in a way that involves no ears, only my fingertips for the moment when that beautiful dough will whisper to me "I am ready".

Baking, for me, began as a practice in patience, but has become a welcome obsession. Where will it lead? What will I learn? Who can say!?! But, if luck be on my side, then perhaps the journey will know no end and one day I will make a feast for family and friends that will begin with the simple tradition of water and grain.

Saturday, April 17, 2010

Personal Rant- a Local One

Errrrght! Let's stop for a moment and switch gears. OK- a small rant: What's the deal with all of this locavore talk?!?! I mean, I'm one to support local farmers and producers as much as the next guy or gal, but ONLY SO LONG AS THE PRODUCT IS OF A QUALITY WORTH SUPPORTING! If local farmers want to make a go of it, I say, "power to you brother! But pretty please with raspberries on top, make it's taste blow my friggin' mind!" Thankfully, in Seattle, WA, this isn't an issue. Our farmers and chefs are producing a top quality-tasting product in addition to the local and organic qualities we hold oh, so dear. But what of those out there who are riding the coattails of the "local" Conga line? Personally, and I don't care if this does sound Republican, I prefer to eat food with flavors that bring me to my knees, even if that means eating food not grown locally!

We, as consumers, should absolutely not support producers for the sole reason that they are local, but rather, because their product is superior and, as a perk, they are also local! May I remind you all that human civilization was built on trade and "globalization"; this is no new concept to our way of being and Mr. Ford had a point about specialization. Whether or not that means we should eat Strawberries in January is another matter. Personally, I say eat what you like, try to eat in season, and for God's sake support products that taste of angel's kisses due to their flavor and not for where they are produced!

Either way, travelling foods will nearly never taste quite as good as ones produced locally anyway, but we should still demand a high quality from our producers all the same. I would rather eat better tasting food from Argentina, than mediocre-tasting food from Washington state!

Tuesday, March 16, 2010

Scratch March

Hello all!

March was supposed to be dedicated to a story of attempted vegetarianism composed by Eric and myself, but alas, due to a calamity of hectic events that have thus taken over this month, I have decided to postpone Vegetarian March to Vegetarian April. Being vegetarian has proven to be more difficult to manage than anticipated and, as I am not as organized as one would hope, will dedicate myself to unearthing the stories behind what it means to be vegetarian and return in April with a series of tantalizing foodietales just for you!

I do, however, refuse to leave you entirely empty-stomached and amidst the chaos, was able to make one delectable vegetarian meal showcasing a most garlicky and scrumptious home-made hummus accompanied by whole grain bread, apple, olive oil, and red pepper. Not earth-shattering by any means, but, in the infamous words of Colonel Sanders, "finger lickin' good!" all the same.

1 can drained chickpeas (or about 15 oz of dried chickpeas soaked overnight, then added to double the amount of boiling water, then reduce heat and simmer for 2 hours with a bay leaf)
3-4 Tbs cumin seeds dry toasted in a pan
1-3 cloves garlic
pinch saffron infused in 1/4 cup extra virgin olive oil
handfull of chopped parsley
1-2 Tbs pimentón (Spanish smoked paprika)
Juice of 1/2 a lemon
salt and pepper to taste

1. Add garlic, cumin seeds, and pinch of salt to a food processor. Pulse until well chopped (Use mortar and pestle if you don't have a food processor)
2. Add the drained and rinsed chickpeas, turn the food processor on and add the saffron-infused olive oil
3. Add the lemon juice and additional olive oil until you have a semi-smooth paste-like consistency
4. Arrange on a plate, making a little well around the edges and a hummus mountain in the middle
5. Sprinkle with pimentón, parsley, and olive oil so that it makes a little mote around the mountain


Happy eating and until April!
-Andreya


Thursday, February 25, 2010

Olive the Rest

Athena blessing the olive tree. Photo source: http://www.egreenway.com/meditation/olive.htm

This month's goal of writing every week about olives didn't exactly prove to be fruitful- but that's okay, because I have learned a few new tidbits and, as the last post of Olive February, will offer them up to you now. There is so much to learn about olives, that I found myself floundering amidst a swarm of information and only able to grab at a few small morsels which helped me to better understand Olive’s story.

Firstly, let’s talk origins. Olives were one of the very first foods to be cultivated by humans; I suspect for their many uses including fuel, cooking, cleansing, and healing; originating in Asia Minor (Crete, Syria, Iran, etc...) and then spreading to and the rest of the Mediterranean between 5000 and 14000 BCE. [1] Of course, that’s all mythology- everybody knows that the olive came to the people via the clever generosity of Athena as a ploy to win her, rather than her competitor Poseidon, the patronage of Athens. Regardless of its origin, the olive tree has influenced our perceptions; from the peaceful gesture of an outstretched branch, to the violent end one would meet in the ancient world by cutting it down; our civilization has been built on the backbone of the mighty olive.

Fun fact: Olive oil was a major import for ancient Rome (and still is for modern Rome) from the provinces, mainly Baetica, present Andalucia. It was transported via shipping vessels in containers called amphorae, which were specifically designed to fit the shape of the ship and provide multiple handles for the ship loaders. Roman citizens re-used the amphorae any way possible and, despite their dedication to be green, still managed to create an entire mountain of thrown-out, un re-used amphorae, located within the city limits of Rome. Monte Testaccio is an archaeological gem where amphorae, along with other clay treasures from ancient Rome, were deposited as a garbage heap. Many of the pieces are so well preserved, that the branding is still legible, which tells us which families and regions were most prevalent in producing olive oil for Rome- Spain was one of the greatest- and still is. In fact, most Italian olive oil is actually produced in Spain and sent to Italy, blended with some Italian oil, and sold as Italian. So don’t snub the Spanish! They know what they’re doing when it comes to olives (and wine, but that’s another story).[2]

Amphorae photo source:http://www.stalbansmuseums.org.uk/historyhunt/roman/images/amphorae.jpg

Recipe for Olive Relish taken from the Classical Cookbook.[3]

This recipe was left for us by Cato, a Roman soldier whose farming handbook has given great insight into the food world of ancient Rome.

To make green, black, or mixed olive relish:

1. Pit and then chop 4 oz black, 4 oz green, or 8 oz of each if un-mixed olives

2. Add 4 Tbs olive oil, 4 Tbs red wine vinegar, 2 tsp chopped fresh coriander (cilantro), 2 tsp fresh chopped cumin (if you cannot find fresh cumin, then roast and add the seed), 1 heaping tsp chopped fennel (minced bulb or fresh leaf), 2 tsp chopped rue[4], 3 tsp chopped fresh spearmint

3. Put in a sealable container and either serve immediately, or store for future use. The flavors will develop and become more delicious if stored for a few days before eating- but who can hold back with something as yummy as this?!?!

Serve with toasted pita and alongside grilled foods, such as chicken or eggplant.


[2] Moveable Feasts by Sarah Murray 2007 Picador NY; http://www.archaeospain.com/testaccio/

[3] The Classical Cookbook is a compilation of recipes and feasting rituals from ancient Greece and Rome; I find it most interesting that recipes from those regions have remained fairly constant over time- Modern Greeks and Italians eat mostly the same foods as their ancestors!

[4] Rue, or Ruta graveolens, is an intensely bitter herb used abundantly in ancient Mediterranean cookery, but presently mainly used in Ethiopian cooking and as a garden ornamental. Rue also acts as a healer for digestive ailments (as with most bitter herbs and greens) and keeps away cats. Source: http://www.botanical.com/botanical/mgmh/r/rue---20.html http://www.clovegarden.com/ingred/herbs.html

Wednesday, February 10, 2010

Sugo alla puttanesca

The grey Seattle winter presses upon me in the most unfavorable of manners as I close my eyes and dream of far away lands where the breeze is balmy and the food is spicy; all I want at this moment is to be warm! Sugo alla puttanesca is the ideal treat for a day like today- it's zesty, hot, and vibrant- just the vacation I'm seeking to transport my senses to the sizzling, Ischian sun.

Sugo alla puttanesca, or Puttanesca sauce, began to pop-up around the early 1960's in Southern Italy- specifically in Ischia, a small island off the coast of Naples in the Campania Region. The birth of the sugo, or sauce, is draped in mystery. It could have been born out of the Napoleon brothels as a means to nourish the roused customers; or it could have been created by the famed Ischian restaurateur, Sandro Petti, as a way to feed his friends after hours with whatever he found in the pantry, which happened to include anchovy, tomato, garlic, onion, caper, and our star- the olive.* Despite, or possibly because of its mysterious origins, sugo alla puttanesca has become beloved amongst those of us yearning to taste the sun.

* For a more detailed account of the origins of sugo alla puttanesca, visit Jeremy Parsen’s incredibly enlightening blog about everything-Italian-food: http://dobianchi.com/2008/01/13/the-origins-of-sugo-alla-puttanesca/

Recipe for sugo alla puttanesca:

Ingredients:

½ cup extra virgin olive oil

1 Medium onion, minced

4-8 Garlic gloves, minced

¼ - ½ tsp red pepper flakes to taste

Pinch salt and pepper to taste

1 32 oz. can of whole, peeled tomatoes, pureed

4-6 Tbs capers (to taste)

¼- ½ cup pitted and halved olives (traditionally black, such as Kalamata, or a mixture of your favorite olives)

¼ cup chopped parsley, basil, or combination of the two

3-5 anchovies, filleted and chopped (these can be omitted if you are making a vegan sauce)

1 box of your favorite thin, long pasta such as spaghetti or linguine.


I. The Sauce

*Give yourself enough time to let the sauce simmer for at least 30-60 minutes before eating.

1. Coat the bottom of a large saucepan with olive oil over med-high heat

2. Add onion, garlic, pepper flakes, salt and pepper and sauté until just barely browned

3. Add tomato puree and scrape-up any brown bits of the bottom of the pan (de-glaze) to add a richer flavor to the sauce.

4. Let the sauce simmer for at least 30 – 45 minutes, until it’s thickened and no longer watery

5. About 10 minutes before you’re ready to eat, cook your pasta until mostly done, but still crunchy

6. Add the capers and olives and simmer for 5 minutes

7. Add anchovies and herbs, season with salt and pepper, and turn down the heat

8. Add the pasta and let it finish cooking in the sauce (about 2-3 minutes)


Serve with a drizzle of spicy olive oil, some crumbled ricotta, if you have it, and revel in the intoxicating essence of a sauce that was created in and by the sizzling Italian sun.

Happy Eating!

- Andreya

Tuesday, February 9, 2010

Nourished by Olives


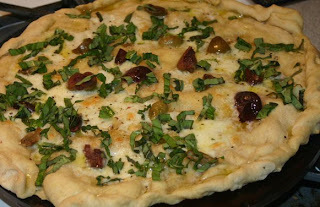
I’m hungry! Too hungry to write or to think or to do anything that doesn't involve eating. I long to be nourished and will soon be on my way… after the pizza’s out of the oven. 15 minutes later…crisis averted. First bite taken and I’m finding ecstasy in a mass of utter imperfections! Look at that crust- lop-sided, nowhere near round, and most definitely not of an even thickness. Normally, I would be disappointed, but not today. Today… bliss. Yumm! This is why people have been eating olives since the beginning of civilization. I am nourished.


“I’m So Starving Feed Me Olives Pizza”

For the dough (personally modified from Alice Waters’ The Art of Cooking):

2 Tsp Yeast

¼ cup luke-warm water

¼ cup Rye flour

3 ¾ cup white spelt or unbleached all purpose flour

¼ cup extra virgin olive oil

¾ cold water

Pinch of salt


For the rest:

1 fresh mozzarella ball

1 handful of your favorite olives, pitted and cut in half or quartered

¼ cup fresh basil (or your favorite herb like parsley or thyme), roughly chopped

Extra virgin olive oil


Salad and dressing:

I head of Red Leaf, your favorite lettuce, or a salad mix

1 tsp Dijon mustard

1 Tbs red wine vinegar, white wine vinegar, or apple cider vinegar

3 Tbs Extra virgin olive oil*

1 Tbs minced shallot

A large pinch of chopped basil

Salt and pepper to taste

*The vinegar (meaning acid) to oil ratio is 1:3, so if you’re making less or more, you can adjust the amounts accordingly. Also, you can use any vinegar or acid (such as lemon juice) that you like.


I. The Dough

*Your dough will need at least 3 hours to fully develop. I recommend making it the evening before and letting it rise overnight in your fridge.

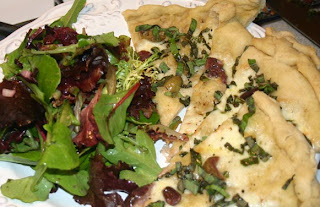
** This dough will make either two 9 in round pizzas, or 1 long 18 in rectangular focaccia.

1. Put the yeast and ¼ cup warm water in a large bowl and leave alone until the yeast has dissolved- about 5 minutes.

2. Make the “Sponge” (yeast and a little bit of flour) by adding ¼ cup Rye Flour and ¼ cup white flour to the dissolved yeast and mix together until the lumps are gone. Using a wooden spoon is recommended and feels more professional, but it’s easier to get a smooth mixture with a whisk, although that adds extra air, so do whichever you prefer- the taste is the same either way.

3. Now cover the bowl with a clean towel, put it somewhere warm, and leave the sponge alone to develop for at least 20 minutes and up to an hour. This will allow the yeast to ferment and develop a truly lovely flavor and aroma. When the sponge is completely bubbly, then it’s ready for the next step.

4. Add the rest of the flour, ¼ cup olive oil, ¾ cup water, and salt. Mix together with a spatula or wooden spoon until the dough begins to form a ball, then plop it out onto a floured surface and knead for 5-20 minutes until the dough becomes elastic; when you press your finger into it and the depression bounces back- you’re done. It will look round, lovely, and you’ll say to yourself, “that’s exactly what a ball of dough should look like!”

5. Put the dough ball into a clean bowl that’s been coated with olive oil. Give the dough a twist and then turn it over so that the entire surface of the ball is coated with oil. Cover with plastic wrap and a towel and put it somewhere warm until the dough has doubled in size- about 1 hour.

6. After it’s doubled, punch the dough down in the middle to re-distribute the yeast, cover, and let continue to rise for either another 2 hours or overnight in the fridge.


II. The Pizza

*To make this an entirely vegan meal, omit the cheese, add some chopped rosemary or thyme or combo thereof, and double the amount of olives.

** If you have a baking stone, be sure that it is preheated and that your peel (a paddle-like tool made out of wood used to maneuver breads and pizzas in and out of the oven) is coated with cornmeal or flour so that the dough does not stick. If you do not have a baking stone, use a pre-heated metal sheet pan and be careful not to burn yourself.

1. When you’re ready to make the pizza or focaccia, cut the dough ball in half (or leave whole for 18 in focaccia) and stretch the dough to the desired size by making a fist, laying the dough over the back of your fist, and pulling lightly then rotating the dough around your fist until the desired size is reached. You can also flatten the dough on the surface, push it outward with your fingers, and then pull lightly from the edges. Do not use a roller; otherwise you will push out all of the air that makes the bread light and heavenly.

2. Preheat oven to 400 and add the stretched dough drizzled with olive oil, cheese, and olives for about 10-13 minutes or until the cheese has lightly browned. Remove and add the chopped basil immediately, then add fresh ground pepper and drizzle with olive oil.


III. The Salad Dressing:

1. Mix mustard and vinegar together then slowly whisk in the olive oil. Add minced shallot, basil, and salt and pepper to taste. Toss with the greens.


Super lengthy instructions, I know, but you’ll get the hang of it and I promise that the end result is well worth the work! I also recommend keeping a dough ball in the fridge so that you can easily make a pizza or focaccia when you get home at the end of a long day. Let me know if you have any questions and remember to pour a glass of wine, sing your favorite song, and enjoy the process of nourishing your stomach and your soul.

Happy Eating!

- Andreya